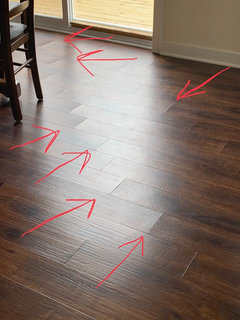
Have you ever walked across your beautiful vinyl plank flooring and felt a disconcerting “give” beneath your foot? Maybe you’ve even noticed a plank or two completely lifted from the subfloor, leaving a gap that looks like a gaping maw in your once-perfect space. If this sounds familiar, you’re not alone. Lifting vinyl plank flooring is a common problem, but it’s one that can be fixed with the right knowledge and a little bit of elbow grease.

Image: cinvex.us
Lifting vinyl planks, while a nuisance, can turn into a major headache if left unaddressed. This can not only affect the aesthetic appeal of your home, but also pose real safety hazards. Fear not, though! This guide delves into the whys and hows of vinyl plank lifting and offers concrete solutions to restore your flooring to its former glory. By understanding the cause of the problem, you can take steps to prevent it from happening again in the future.
Understanding the Cause of the Lifting
Before we delve into the solutions, let’s first understand why those planks decide to play peekaboo with your subfloor.
- Insufficient Subfloor Preparation: It all starts with the foundation. A subfloor that isn’t smooth, flat, and adequately stable can lead to unevenness which in turn, causes the planks to lift. Think of it like building a house on shaky ground – the whole structure suffers.
- Moisture Issues: Moisture is the silent saboteur of flooring. If your subfloor is damp, water can seep under the vinyl planks, causing them to warp and buckle. This is particularly common in areas prone to leaks or humidity, like bathrooms, kitchens, and basements.
- Improper Installation: A common culprit of lifting planks is inadequate installation. Improperly secured planks, inadequate adhesive, or a lack of expansion gaps can all contribute to planks coming loose from the subfloor. Imagine putting together a puzzle without the right pieces – it’s bound to fall apart!
- Heavy Foot Traffic: High-traffic areas are prone to increased wear and tear, especially on vinyl planks. When the subfloor isn’t prepared correctly or the underlayment is inadequate, the repetitive pressure can cause the planks to lift. Think of it like a constant stream of cars on a poorly constructed road – eventually, the road will give way.
- Temperature Fluctuations: Just like a chameleon changes its color with the environment, vinyl plank flooring can expand and contract with temperature changes. If your flooring is exposed to extreme temperature swings, the planks might expand and push against each other, causing them to lift.
Solutions to Fix Lifting Vinyl Plank Flooring
Now that we know the root of the problem, let’s get into the practical steps to address lifting planks:
1. Assess the Damage:
A thorough inspection is the first step. Check the extent of the lifting and determine if it’s a minor issue affecting a few planks or a large-scale concern. This will dictate the approach you take.
2. Address Moisture Issues:
If you suspect moisture to be the culprit, investigate potential leaks and ensure proper ventilation in areas prone to humidity. A moisture meter can be helpful to assess the moisture levels in your subfloor. This might involve calling in a professional to address plumbing issues or upgrading ventilation systems.
3. Clean the Subfloor:
Before fixing any lifted planks, it’s essential to prepare the subfloor. Remove debris, dirt, and any loose material that could interfere with the adhesive. Vacuum or sweep the area thoroughly.
4. Secure the Planks:
For minor lifting, you can sometimes re-secure the planks by using a construction adhesive. Apply adhesive to the underside of the lifted plank, pressing it firmly against the subfloor. For larger gaps, you may need to use screws or nails to secure the plank in place.
5. Replace Damaged Planks:
If a plank is significantly damaged or warped, replacement is the best way to go. Carefully remove the damaged plank, ensuring there are no loose nails or staples left behind. Insert a new plank, aligning it with the surrounding planks. Secure it using adhesive or mechanical fasteners as needed.
6. Implement Expansion Gaps:
To prevent future lifting caused by temperature fluctuations, ensure proper expansion gaps are maintained around the edges of your flooring. These gaps allow the planks to move freely without putting pressure on each other.
7. Consider a Professional:
For extensive lifting or if you’re unsure about the cause or how to proceed, it’s best to contact a professional flooring installer. They have the expertise and equipment to identify the root of the problem and implement the most effective solution.
Expert Tips for Preventing Future Lifting:
- Install Underlayment: Underlayment adds a layer of cushioning and protection, helping to absorb minor imperfections in the subfloor and reduce noise. Choose a suitable type of underlayment depending on your needs, whether it’s moisture-resistant, sound-dampening, or a combination of both.
- Hire a Qualified Installer: Don’t overlook the importance of choosing a professional and experienced flooring installer. They have the knowledge and expertise to ensure your vinyl plank flooring is installed correctly to prevent future lifting issues.

Image: home.alquilercastilloshinchables.info
How To Fix Lifting Vinyl Plank Flooring
Conclusion:
Lifting vinyl plank flooring can be stressful, but with the right knowledge and a bit of effort, you can restore your flooring to its former glory. By thoroughly checking the cause, preparing the subfloor, and re-securing the planks, you can address the problem head-on. Remember, prevention is key! Investing in proper underlayment, securing expansion gaps, and seeking professional help when needed can help you avoid future lifting and ensure your vinyl planks stay put for years to come. Don’t hesitate to share your experiences and learn from others – together we can keep our flooring in tip-top shape!


